Saturday, February 27, 2016
Monday, February 22, 2016
Cast on Styles _ knitting
I am trying to compile some of the best tutorials for the cast on styles. Please feel free to suggest if you have any favourites
1. 2 Color Cast on (LTCO)
- Two Color Cast On
2. 3 Color Cast on (Braided)
- Three Color Cast On
3. Alternating long-tail Cast on
- Alternating Long Tail Cast On
4. Cable Cast on
- Cable Cast On
- Cable Cast On
5. Old Norwegian Cast On
- Old Norwegian Cast On
6. Chain Cast on
- Chain Cast On
- Chain Cast On
7. Alternate Cable Cast on
- Alternate Cable Cast On /
8. Backward Loop Cast on
- Backward Loop Cast On
9. Channel Island Cast on
- Channel Island Cast On
10. Chinese Waitress Cast on
- Chinese Waitress Cast On
11. Double Start Cast on
- Double Start Cast On
12. Emily Ocker's Circular/ Magic Circle Cast On
- Magic Circle Cast On
13. Garter Tab Cast On
- Garter Tab Cast On
14. Crochet Provisional Cast On
- Crochet Provisional Cast On
15. Figure Eight Cast On
- Figure Eight Cast On
16. I-Cord Cast On
- I-Cord Cast On
17. Invisible Circular Cast On
- Invisible Circular Cast On
18. Italian Tubular Cast On
- Italian Tubular Cast On
19. Knitted Cast On
- Knitted Cast On
20. Long Tail Cast On
- Long Tail Cast On
20. Italian Tubular Cast On, 2x2 Rib - I couldn't find a image only tutorial. Hence, a video here
- Italian Tubular Cast On
20. Judy's Magic Cast On
- Judy's Magic Cast On
21. Estonian Lace Cast On
- Estonian Lace Cast On
22. Moebius Cast On
- Moebius Cast On
23. Picot Hemmed Edge Cast On
- Picot Hemmed Edge Cast On
24. Tillybuddy's Cast On
25. Twined Cast On
26. Turkish Cast On
27. Slipknot Cast On
28. Picot Cast On
Sunday, February 21, 2016
Saturday, February 20, 2016
Friday, February 19, 2016
Split-toe Socks
I thought I will never learn to do a split-toe socks but I managed to made the first pair and wrote the pattern simultaneously
He is the finish product
Pattern :
For the Cuff :
- - 1.
Slip 1, Knit 1He is the finish product
For the Cuff :
- Cast on
40 stitch on a circular needle
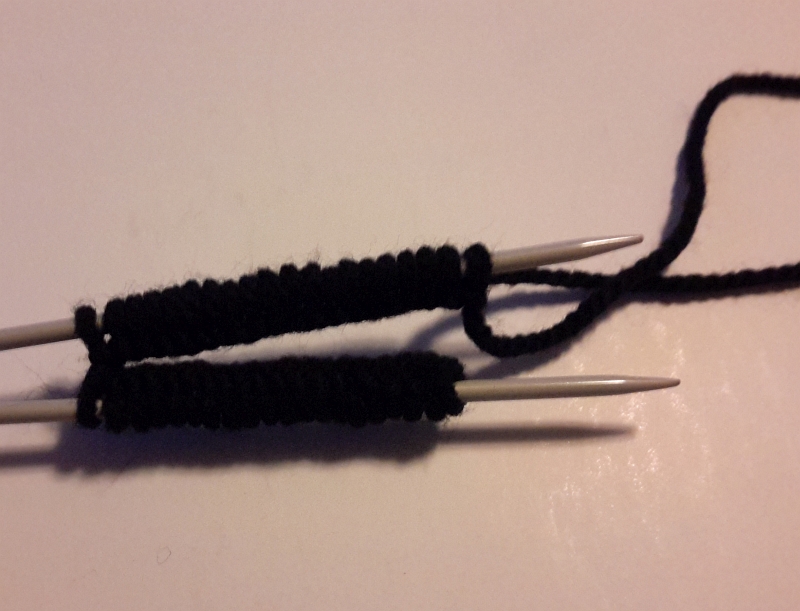
- long tail cast on
- pull out one side
- divide the stitch into 2 equally
- bring it forward to knit
- pull the side with the working yarn
- 2 rounds
of black yarn (K2P2 rib)
- K2(white
yarn), P2(black yarn)
- 2 rounds
of black yarn(K2P2 rib)
- K2(white
yarn), P2(black yarn)
- 2 rounds
of black yarn(K2P2 rib)
- 2 rounds
of white yarn(K2P2 rib)
- K2(white
yarn), P2(black yarn)
- 2 rounds
of black yarn(K2P2 rib)
- K2(white
yarn), P2(black yarn)
- 4 rounds
of black yarn(K2P2 rib)
- Knit all
(white yarn)
For the Heal Flap:
We have to knit on the 20 stitches (on one side )
<!--[if !supportLists]
- - 2.
Purl
- Repeat step 1 and 2, 11 times
- - Slip 1, Knit 1
For the Heal turning:
- we continue working on the same piece (heal flap)
- Step 1. - Purl 12, P2tog, P1, turn
- Step 2. - Slip 1, K5, SSK, K1, turn
- Repeat step 1 and 2 till only 12 stitch are left ( remember we reduce te stitches to 12 from 20 at this point)
For the Gusset:
- With the same needle where we have the 12 stitches, we pick up 13 stitches on the side as in the image below - Now we will have 25 stitch on this needle (12+13 =25)
Now we have to knit the side which we left (the other side) when we started the heal flap
- Knit 20 and then pick up 13 stitches. So, on the other side we have 33 stitches
* But now to have to divide the stitches equally on both side and place marker at the area where we have to do the decreasing (refer the image below)
* Now you should have 29 stitches on each side
- Knit 20 and then pick up 13 stitches. So, on the other side we have 33 stitches
* But now to have to divide the stitches equally on both side and place marker at the area where we have to do the decreasing (refer the image below)
* Now you should have 29 stitches on each side
Step 1. - K16, K2tog, K, Marker, K10, Marker, SSK, K17
- Knit All
Step 2. - K15, K2tog, K, Marker, K10, Marker, SSK, K16
- Knit All
SStep 3. - K14, K2tog, K, Marker, K10, Marker, SSK, K15
- Knit All
SStep 4. - K13, K2tog, K, Marker, K10, Marker, SSK, K14
- Knit All
SStep 5. - K12, K2tog, K, Marker, K10, Marker, SSK, K13
- Knit All
Change to black color yarn
SStep 6. - K11, K2tog, K, Marker, K10, Marker, SSK, K12
- Knit All
SStep 7. - K10, K2tog, K, Marker, K10, Marker, SSK, K11
- Knit All
Change to White and start knitting for the foot (Here keep knitting the round till you get your desired length)
For my socks, I did the following round
- 1 round of white, all knit
- 4 rounds of light blue, all knit
- 5 rounds of white, all knit
- 3 rounds of yellow, all knit
- 1 round of mix (1 yellow, 1 dark green)
- - 3 rounds of yellow, all knit
- 1 round of mix (1 yellow, 1 dark green)
- - 3 rounds of yellow, all knit
- 1 round of mix (1 yellow, 1 dark green)
- - 3 rounds of yellow, all knit
- 5 rounds of white, all knit
- 6 rounds of pink, all knit
- 4 rounds of white, all knit
At this stage we will have 44 stitch on our needle
For the left Toe :
- To make it clear for my viewer, I have shot the below image of the sock from the top as if to wear (this view help us understand where we want to have the big toe for left or for right)
We will start knitting where we have our marker now in the circle area in the above image for the big toe
- Step 1 : - Knit 8, cast on 4 by using back loop method, K8 - We will have 20 stitches now for the big toe. Here I am using DPN instead of circular needle (the remaining stitches, held in a wasted yarn)
- Continue knitting till the length is a little shorter than your toe. In my case I did 14 rounds of Step 1
Then we will have start decreasing to close the toe
- K3, K2tog all round
- K2, K2tog all round
- K, K2tog all round
- K2tog all round and finish with needle
For the left remaining toes :
We have to now work on the stitch which was held in the wasted yarn while we were doing the big toe
- Knit 28 stitches and then pick up 4 next to the big toe to close the gap = 32 stitches
- Knit 3 rounds - all knit
We will have decreasing at the place where we have this 2nd marker which is circle in green in the above image
- from the first marker, we will count
- K13, K2tog, K, Marker, K, SSK, K13
- Knit all
- K12, K2tog, K, Marker, K, SSK, K12
- Knit all
- K11, K2tog, K, Marker, K, SSK, K11
- Knit all
- K10, K2tog, K, Marker, K, SSK, K10
- Knit all
- K9, K2tog, K, Marker, K, SSK, K9
- Knit all
Close it with Kitchener stitch :)
Refer the image above for the right toe and follow the pattern similarly as of Left Toe
- Knit All
Step 2. - K15, K2tog, K, Marker, K10, Marker, SSK, K16
- Knit All
SStep 3. - K14, K2tog, K, Marker, K10, Marker, SSK, K15
- Knit All
SStep 4. - K13, K2tog, K, Marker, K10, Marker, SSK, K14
- Knit All
SStep 5. - K12, K2tog, K, Marker, K10, Marker, SSK, K13
- Knit All
Change to black color yarn
SStep 6. - K11, K2tog, K, Marker, K10, Marker, SSK, K12
- Knit All
SStep 7. - K10, K2tog, K, Marker, K10, Marker, SSK, K11
- Knit All
Change to White and start knitting for the foot (Here keep knitting the round till you get your desired length)
For my socks, I did the following round
- 1 round of white, all knit
- 4 rounds of light blue, all knit
- 5 rounds of white, all knit
- 3 rounds of yellow, all knit
- 1 round of mix (1 yellow, 1 dark green)
- - 3 rounds of yellow, all knit
- 1 round of mix (1 yellow, 1 dark green)
- - 3 rounds of yellow, all knit
- 1 round of mix (1 yellow, 1 dark green)
- - 3 rounds of yellow, all knit
- 5 rounds of white, all knit
- 6 rounds of pink, all knit
- 4 rounds of white, all knit
At this stage we will have 44 stitch on our needle
For the left Toe :
- To make it clear for my viewer, I have shot the below image of the sock from the top as if to wear (this view help us understand where we want to have the big toe for left or for right)
We will start knitting where we have our marker now in the circle area in the above image for the big toe
- Step 1 : - Knit 8, cast on 4 by using back loop method, K8 - We will have 20 stitches now for the big toe. Here I am using DPN instead of circular needle (the remaining stitches, held in a wasted yarn)
- Continue knitting till the length is a little shorter than your toe. In my case I did 14 rounds of Step 1
Then we will have start decreasing to close the toe
- K3, K2tog all round
- K2, K2tog all round
- K, K2tog all round
- K2tog all round and finish with needle
For the left remaining toes :
We have to now work on the stitch which was held in the wasted yarn while we were doing the big toe
- Knit 28 stitches and then pick up 4 next to the big toe to close the gap = 32 stitches
- Knit 3 rounds - all knit
We will have decreasing at the place where we have this 2nd marker which is circle in green in the above image
- from the first marker, we will count
- K13, K2tog, K, Marker, K, SSK, K13
- Knit all
- K12, K2tog, K, Marker, K, SSK, K12
- Knit all
- K11, K2tog, K, Marker, K, SSK, K11
- Knit all
- K10, K2tog, K, Marker, K, SSK, K10
- Knit all
- K9, K2tog, K, Marker, K, SSK, K9
- Knit all
Close it with Kitchener stitch :)
Refer the image above for the right toe and follow the pattern similarly as of Left Toe
Thursday, February 18, 2016
Pink Seamless Slipper
I did this so adorable pinky pink slipper for my freind using the pattern I wrote few days back.
The pattern was available free on my blog for a limited period of time. It is available now on my Ravelry store Seamless Slipper
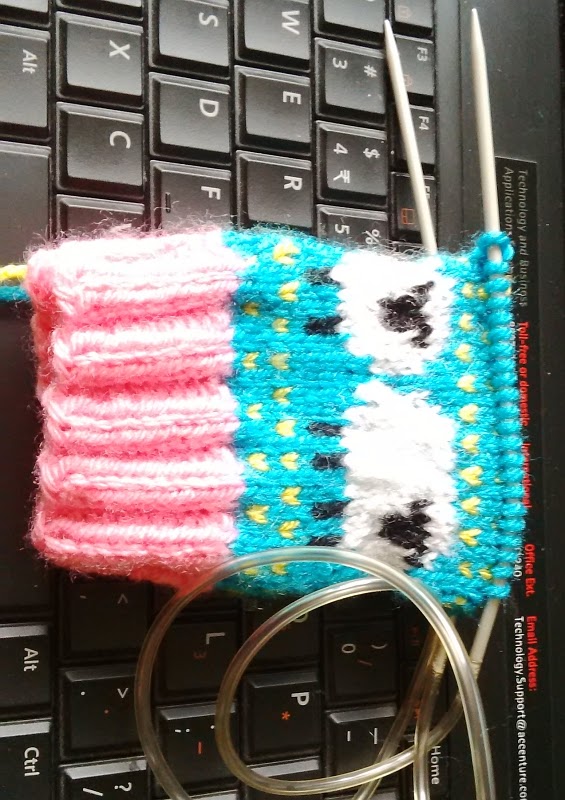
Trying out a sock with inspiration from Donna Smith's design
The Baa-ble Hat pattern in Ravelry fro Donna Smith is a heart winner, http://www.ravelry.com/patterns/library/baa-ble-hat, I wanted to try the pattern but didn't want to make a hat. Do, I am trying out knitting a sock now
Needle : 11
Yarn : 4 ply, 100 % acrylic
Cast on 44 -I usually cast on 40 but for the pattern, I had to increase 4 but looks ok so far
- K2P2 rib for 10 rounds in pink and then I made the pattern below for this sock
- I am not a pro at using multiple colors and doing this pattern in the circular needle was driving me crazy. So, I switch the stitches in 4 needles
- its totally worth it so far
- I am loving it, I will post images as I go through
Subscribe to:
Posts (Atom)