Sunday, July 31, 2016

Sample for Petal neck pattern - Knit

Free Knit Pattern - Petal neck Stitch


This is a sample for reference in future to do the Petal neck pattern
This pattern calls for 6+ 2 stitches

Cast on 8 stitches (long tail cast on)
1. Knit 7, P1
2. S1, P 7
3. S1, K1, cast on 2 stitches, K2, cast on 2 stitches, K2, cast on 2 stitches, K1, P1
4. S1, p13
5. S1, K2, cast on 2 stitches, K4, cast on 2 stitches, K4, cast on 2 stitches, K2,P1
6. S1, p 19
7. S1, K3,cast on 2 stitches, K6, cast on 2 stitches, K6, cast on 2 stitches, K3,P1
8. S1, p 25
9. S1, K4,cast on 2 stitches, K8, cast on 2 stitches, K8, cast on 2 stitches, K4,P1
10. S1, p31
11. S1, K2tog(tbl), K3, cast on 2 stitches, K3, K2tog, K2tog(tbl), K3, cast on 2 stitches, K3, K2tog, K2tog(tbl), K3, cast on 2 stitches, K3, K2tog, P1
12. S1, p31
13. S1, YO, K2tog, K3, YO, K3, K2tog, YO, K2tog(tbl), K3, YO, K3, K2tog, YO, K2tog(tbl), K3,YO, K3, K2tog, YO, P1
14. S1, p31
15. S1, K1, YO, K2tog(tbl), K5, K2tog, YO, K, YO, K2tog(tbl),  K5, K2tog, YO, K, YO, K2tog(tbl), K5, K2tog, YO, K1, P1
16. S1, p31
17. S1, K2, YO, K2tog(tbl), K3, K2tog, YO, K3, YO, K2tog(tbl),  K3, K2tog, YO, K3, YO, K2tog(tbl), K3, K2tog, YO, K2, P1
18. S1, p31
19. S1, K3, YO, K2tog(tbl), K1, K2tog, YO, K5, YO, K2tog(tbl),  K1, K2tog, YO, K5, YO, K2tog(tbl), K1, K2tog, YO, K3, P1
20. S1, p31
21. S1, K4, YO, S1,K2tog, psso, YO, K7, S1,K2tog, psso, YO, K7, S1,K2tog, psso, YO, K4, P1

Monday, July 25, 2016

Rabbit Slipper

Knitted Slipper

My latest addition

It is fun to add some character in these knitted slipper. Hope to do a series soon :)

If interested to buy :  http://www.ravelry.com/patterns/library/rabbit-slipper
Buy from Ravelry


Tuesday, July 19, 2016

Flower photo enhancement in Photoshop - Tutorial

Photoshop Tutorial - Photo enhancement

Since couple of days, I have been working on some of my old flower shots which I never looked into after clicking. :( While searching for tutorial on flower photo enhancement in internet, I have not come across anything which particularly touch upon all the aspects of enhancement. Hence, I thought I should create one tutorial for my viewers as well as for myself in case of future reference

So, here it is .... (If you find a better tutorial, please feel free to share in the comment)

Step 1 : Open the image in Photoshop
Step 2 : Resize the image as per your requirement (for my example, I resize it to 900 pixel width)
Step 3 : Duplicate background layer (it is advised to have the background layer untouched all the time if in case you don't want the changes and wants to go back to the starting point )
- Right click on the layer - Duplicate layer -Ok

Step 3 : At this stage, I like to work on LAB(Light / A/ B) mode
- Right click on the layer - Convert to smart object - Double click on the smart object thumbnail (the red square in the image below)


- Now you be taken to another tab - now we have to convert this to Lab mode - follow the steps in the image

- Click on "Create New Fill or Adjustment layer icon" + Curves / or Click on image +Adjustments + curves


- Select "a" in the box highlighted below and choose the "Click and Drag in image to modify the curve" tool, which is also highlighted in the box below (the tool which looks like a hand)
- Also you can select "b" and click and drag till you get something which you like


- After selecting the channels "a" and "b" and dragging the curve, I have something like this below


- Then you click the "x" to close this file and when promted to save, click "Yes"


- Rename this layer to "Lab Copy)

Step 4 : At this stage, Let's sharpen the image

- Duplicate the Lab Copy layer -  Click on Blending Mode - Select Linear light


- Now you will have an image which is extremely dark but do not worry
- Now click on "Filter", then "Other" and "High Pass"

- For my image, I choose a lower radius as I don't like overly sharpen image. you can adjust this as per your liking


- This action has sharpen the entire frame but I wanted to only sharpen the flower. So, I will click on "Layer", then "Layer Mask" and "Hide All"


- Now paint with the brush only the flower area to unhide, if you have painted area which you don't want, just change the color from white to black and paint that area to hide again. You can see the area I painted with white to unhide


Step 5 : This is just repeating Step 4 with only one change 
- Duplicate layer - Pull up the layer on the top - Blending mode to "Overly" and repeat all the steps in Step 4

Step 6 : This is just repeating Step 4 with only one change 
- Duplicate layer - Pull up the layer on the top - Blending mode to "Soft Light" and repeat all the steps in Step 4


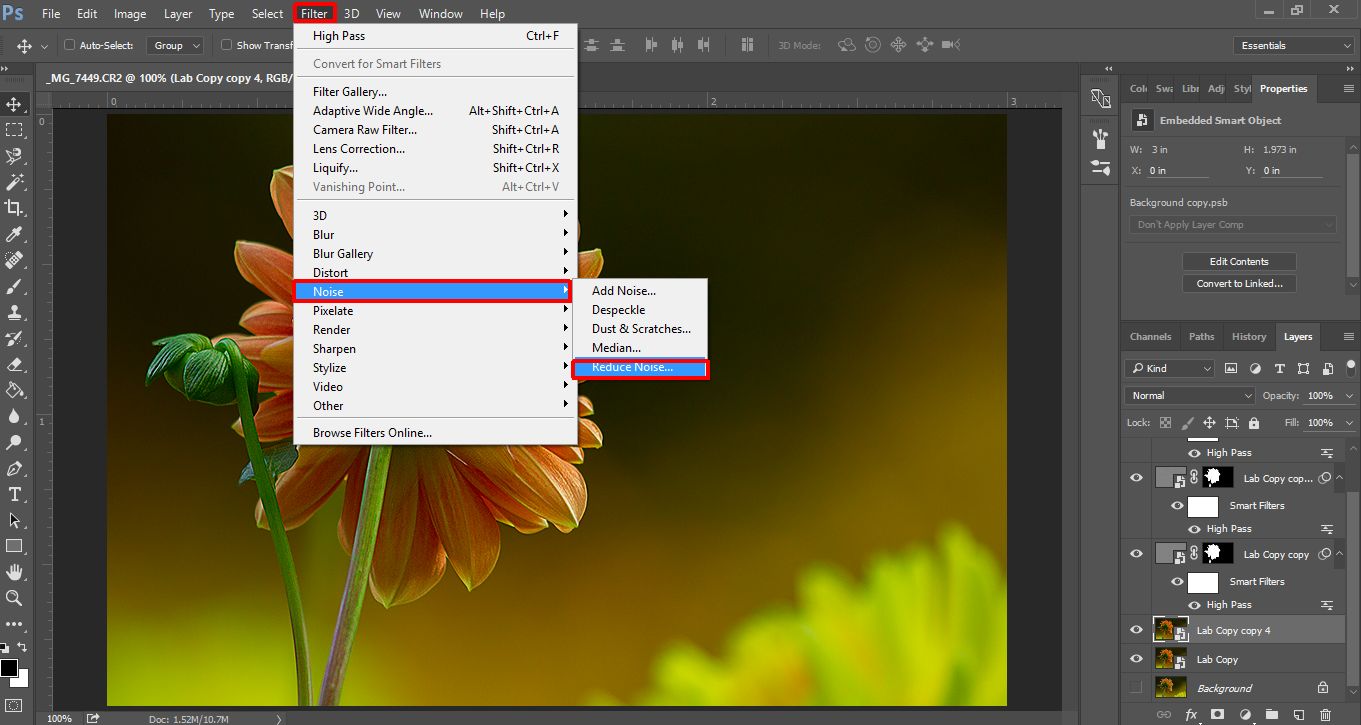
Step 7 : Reduce Noise
 - Duplicate the Lab Copy Lager again. CLick on Filter + Noise + Reduce Noise

- You can play around the highlighted area to check the noise in your image and choose whichever number looks good

- Add a layer mask and unhide the background and now the image looks like this


Before and After image below :

Have Fun!

Friday, June 10, 2016

Ankle length Toe Up socks

Free Pattern - Sock Knitting - Ankle length Toe-up Sock

I wanted a easy knit and also try knitting 2 socks at the time. So, I set out the journey with this beautiful pair of socks. And hurrah! I made and love the soft feeling

Initially I was worried as this is the first time I use 3ply wool for socks and on top of that I use a larger needle. Surprisingly the final product is just too good. Looks awesome even without blocking

I started with 3.5mm needle and for the cuffs, I used 3mm needle

This is for intermidiate level knitting


1. - Using provisional cast on. Cast on 26 stitches
2. - Purl all
3. - Knit all till the last stitch, wrap the last stitch and turn (feel free to watch a youtube video to see how the wrap is done as it is difficult to explain by writing)
4. - Purl all till the last stitch, wrap the last stitch and turn
5. - Slip the first stitch, and knit all the stitches till the 2nd stitch from the end, wrap that 2nd stitch and turn
6. - Slip the first stitch, and purl all the stitches till the 2nd stitch from the end, wrap that 2nd stitch and turn
7. - Slip the first 2 stitches, and knit all the stitches till the 3rd stitch from the end, wrap that 3rd stitch and turn
8. - Slip the first 2 stitches, and purl all the stitches till the 3rd stitch from the end, wrap that 3rd stitch and turn
9. - Slip the first 3 stitches, and knit all the stitches till the 4th stitch from the end, wrap that 4th stitch and turn
10. - Slip the first 3 stitches, and purl all the stitches till the 4th stitch from the end, wrap that 4th stitch and turn
11. - Slip the first 4 stitches, and knit all the stitches till the 5th stitch from the end, wrap that 5th stitch and turn
12. - Slip the first 4 stitches, and purl all the stitches till the 5th stitch from the end, wrap that 5th stitch and turn
13. - Slip the first 5 stitches, and knit all the stitches till the 6th stitch from the end, wrap that 6th stitch and turn
14. - Slip the first 5 stitches, and purl all the stitches till the 6th stitch from the end, wrap that 6th stitch and turn
15. - Slip the first 6 stitches, and knit all the stitches till the 7th stitch from the end, wrap that 7th stitch and turn
16. - Slip the first 6 stitches, and purl all the stitches till the 7th stitch from the end, wrap that 7th stitch and turn
17. - Slip the first 7 stitches, and knit all the stitches till the 8th stitch from the end, wrap that 8th stitch and turn
18. - Slip the first 7 stitches, and Purl all the stitches till the 8th stitch from the end, wrap that 8th stitch and turn

Now we have to pick up the wraps

19. -  Slip the first 8 stitches, then knit till the first wrap stitch (8th stitch from the end), pick up the wrap and K2tog, Wrap the next stitch (7th stitch from the end ) and turn
20. -  Slip the first 8 stitches, then purl till the first wrap stitch (8th stitch from the end), pick up the wrap (pick it from the right side of the work) and P2tog, Wrap the next stitch (7th stitch from the end ) and turn
21. -  Slip the first 7 stitches, then knit till the first wrap stitch (7th stitch from the end), pick up the wrap and K2tog, Wrap the next stitch (6th stitch from the end ) and turn
22. -  Slip the first 7 stitches, then purl till the first wrap stitch (7th stitch from the end), pick up the wrap (pick it from the right side of the work) and P2tog, Wrap the next stitch (6th stitch from the end ) and turn
23. -  Slip the first 6 stitches, then knit till the first wrap stitch (6th stitch from the end), pick up the wrap and K2tog, Wrap the next stitch (5th stitch from the end ) and turn
24. -  Slip the first 6 stitches, then purl till the first wrap stitch (6th stitch from the end), pick up the wrap (pick it from the right side of the work) and P2tog, Wrap the next stitch (5th stitch from the end ) and turn
25. -  Slip the first 5 stitches, then knit till the first wrap stitch (5th stitch from the end), pick up the wrap and K2tog, Wrap the next stitch (4th stitch from the end ) and turn
26. -  Slip the first 5 stitches, then purl till the first wrap stitch (5th stitch from the end), pick up the wrap (pick it from the right side of the work) and P2tog, Wrap the next stitch (4th stitch from the end ) and turn
27. -  Slip the first 4 stitches, then knit till the first wrap stitch (4th stitch from the end), pick up the wrap and K2tog, Wrap the next stitch (3rd stitch from the end ) and turn
28. -  Slip the first 4 stitches, then purl till the first wrap stitch (4th stitch from the end), pick up the wrap (pick it from the right side of the work) and P2tog, Wrap the next stitch (3rd stitch from the end ) and turn
29. -  Slip the first 3 stitches, then knit till the first wrap stitch (3rd stitch from the end), pick up the wrap and K2tog, Wrap the next stitch (2nd stitch from the end ) and turn
30. -  Slip the first 3 stitches, then purl till the first wrap stitch (3rd stitch from the end), pick up the wrap (pick it from the right side of the work) and P2tog, Wrap the next stitch (2nd stitch from the end ) and turn
31. -  Slip the first 2 stitches, then knit till the first wrap stitch (2nd stitch from the end), pick up the wrap and K2tog, Wrap the next stitch (Last stitch ) and turn
32. -  Slip the first 2 stitches, then purl till the first wrap stitch (2nd stitch from the end), pick up the wrap (pick it from the right side of the work) and P2tog, Wrap the next stitch (Last stitch ) and turn
33. -  Slip the first 1 stitch, then knit till the last stitch,  pick up the wrap and K2tog and turn
34. -  Slip the first 1 stitch, then purl till the last stitch, pick up the wrap and P2tog and turn


Pick up another 26 stitchs from the provisional cast on to make the magic circle

35. - Knit all round .....................................................(52)
We will follow the colorwork pattern below for the next rounds and then we will do the Heels


Now, its time for the Heels
At this point, we will work only on one side of the sock, that is only on 26 stitches
For the heals, we will just have to reapeat from row 3 to row 34

After we complete the heels,
- We will 9 rounds of all Knit
- 14 rounds of K1P1 rib

I used tubular bind off as I like the look and it is quite strechy too

Please feel free to drop a comment if you find any mistake in the pattern or need any help


Tuesday, June 7, 2016

Heart Motif Toe Up Socks

Free Pattern - Sock Knitting - Toe-up Sock

Needle - 3mm
Yarn - 4 ply
Fits - US size 8-9

1. - Using Judy's cast on, cast on 28 stitches (14 above and 14 below) - There are lots of videos in Youtube, refer them to help you understand ....................................(28)
2. - Knit all.........................................................................................(28)
3. - M1, K14, M1, M1, K14,M1 ........................................................(32)
4. - Knit all
5. - M1, K16, M1, M1, K16,M1 ........................................................(36)
6. - Knit all
7. - Knit all
8. - M1, K18, M1, M1, K18,M1 ........................................................(40)
9. - Knit all
10. - Knit all
11. - M1, K20, M1, M1, K20,M1 ........................................................(44)
12. - Knit all
13. - Knit all
14. - M1, K22, M1, M1, K22,M1 ........................................................(48)
15. - Knit all
15. - Knit all
16. - Now we need the chart below

17. - Knit all
18. - Knit all
19. - Repeat the chart above
20. - Knit all
21. - Knit all
22. - Knit all
23. - Knit all
24. - Knit all
25. - Knit all

Now the HEEL part: I use the short rows for the heels, refere youtube video for that
1. Now we will work only one one side ...........................................(24)
2. Knit all till the last stitch, wrap the stitch and turn
3. Slip 1, purl till the last stitch , wrap the last stitch and turn
4. we will continue this pattern of wrapping and turning till we wrap the 6th stitch - so on both sides, you should have 6 stitches wrap
5. Now its time to pick up those wraps, Knit till the first wrap (6th wrap stitch), pick up the wrap, k2tog, wrap the next stitch and turn (so we have wrap the 5th stitch twice now)
6. Purl till the 6th wrap stitch, pick up wrap (pick up from the right side), p2tog, wrap the next stitch and turn
7. continue this till you pick and knit all the wraps you did

We will continue now knitting for the ankle
1, Knit all ..........................................................................(48)
2. to 33 rounds - K2P2 rib
Bind off


Thursday, May 19, 2016

Saturday, May 14, 2016

Knitted Bunny - Amigurumi - Free Pattern

Free Pattern - Amigurumi - Knitted Toy

Magic loop knitting with circular needle
Body ( 1 piece )
With Yellow Yarn
1. cast on 6 stitchs - long tail cast one ..............................................(6)
2. (K1, M1) x 6 times........................................................................(12)
3. (K2, M1) x 6 times........................................................................(18)
4. (K3, M1) x 6 times........................................................................(24)
5. (K4, M1) x 6 times........................................................................(30)
6. (K5, M1) x 6 times........................................................................(36)
7. (K6, M1) x 6 times........................................................................(42)
8. (K7, M1) x 6 times........................................................................(48)
9. (K8, M1) x 6 times........................................................................(54)
10. (K9, M1) x 6 times......................................................................(60)
11. to 15. Knit all ..............................................................................(60)
16. K24, K2tog, K9, K2tog, K23.......................................................(58)
17. to 18. Knit all ...............................................................................(58)
19. K24, K2tog, K8, K2tog, K22.......................................................(56)
20. to 21. Knit all ...............................................................................(56)
22. k2tog, knit 17, k2tog, knit 7, k2tog, Knit 7, k2tog, knit 17..........(52)
23. k2tog, K16, k2tog, Knit 6, K2tog, Knit 6, k2tog, K16.................(48)
24. (k2tog, K6) x 6 times ...................................................................(42)
25. (k2tog, K5) x 6 times ...................................................................(36)
26. (k2tog, K4) x 6 times ...................................................................(30)
27. (k2tog, K3) x 6 times ...................................................................(24)
28. (k2tog, K2) x 6 times ...................................................................(18)
29. Knit all ..........................................................................................(18)
30. (K3, M1) x 6 times........................................................................(24)
31. (K4, M1) x 6 times........................................................................(30)
with blue yarn
32. (K5, M1) x 6 times........................................................................(36)
33. (K6, M1) x 6 times........................................................................(42)
34. to 37. Knit all ................................................................................(42)
38. (K5, k2tog) x 6 times ...................................................................(36)
39. Knit all ..........................................................................................(36)
40. (K4, k2tog) x 6 times ...................................................................(30)
41. Knit all .........................................................................................(30)
42. (K3, k2tog) x 6 times ...................................................................(24)
43. Knit all ..........................................................................................(24)
44. (K2, k2tog) x 6 times ...................................................................(18)
45. (K1, k2tog) x 6 times ...................................................................(12)
46. k2tog x 6 times
Transfer the 6 stitches in a tapestry needle and sew

CAP :
With blue yarn
1. cast on 6 stitchs - long tail cast one ..............................................(6)
2. (K1, M1) x 6 times........................................................................(12)
3. (K2, M1) x 6 times........................................................................(18)
4. (K3, M1) x 6 times........................................................................(24)
5. (K4, M1) x 6 times........................................................................(30)
6. (K5, M1) x 6 times........................................................................(36)
7. (K6, M1) x 6 times........................................................................(42)
8. (K7, M1) x 6 times........................................................................(48)
9. (K8, M1) x 6 times........................................................................(54)
10. (K9, M1) x 6 times......................................................................(60)
11. to 19. Knit all ..............................................................................(60)
BO

Arms (Make 2)
With Blue Yarn
At the side, pick up 6 stitches (3 above and 3 below to make a circle)
1. Knit all .........................................................................................(6)
2. (K2, M1) x 3 times ......................................................................(9)
3. 8 . Knit all
9. (K1, K2tog) x 3 times .................................................................(6)
Transfer the 6 stitches in a tapestry needle and sew

Legs (Make 2)
with Blue Yarn
At the bottom, pick up 10 stitches (5 above and 5 below to me a circle)
1. Knit all
2. K3, M1, K5, M1, K2...................................................................(12)
3. (K2, M1) x 6 times........................................................................(18)
4. (K3, M1) x 6 times........................................................................(24)
5. (K4, M1) x 6 times........................................................................(30)
6. to 7. Knit all
8.  (K3, k2tog) x 6 times ...................................................................(24)
9.  (K2, k2tog) x 6 times ...................................................................(18)
10. (K1, k2tog) x 6 times ...................................................................(12)
11. K2tog x 6 times ............................................................................(6)
Transfer the 6 stitches in a tapestry needle and sew the end and also sew the leg and the body together on the upper side to that the teddy can sit properly

Ears (Make 2)
With yellow yarn
on the top of the head, pick 6 stitches (3 above and 3 below to form a circle) in such a way that it falls on the side
1. Knit all ............................................................................................(6)
2. (K3, M1) x 2 times .........................................................................(8)
3. (K4, M1) x 2 times .........................................................................(10)
4. Knit all
5. (K5, M1) x 2 times .........................................................................(12)
6. Knit all
7. (K6, M1) x 2 times .........................................................................(14)
6. to 9 Knit all
10. (K5, k2tog) x 2 times ......................................................................(12)
11. Knit all
12. (K4, K2tog) x 2 times .....................................................................(10)
13. Knit all
14. (K3, K2tog) x 2 times .....................................................................(8)
15. Knit all
16. (K2, K2tog) x 2 times .....................................................................(6)
17. Knit all
18. (K1 K2tog) x 2 times .....................................................................(4)
Transfer the 6 stitches in a tapestry needle and sew

Tail (Make 1)
With blue yarn
at the back botthom, pick 6 stitches (3 above and 3 below to make a circle)
1. Knit all .......................................................................................(6)
2. (K1, M1) x 6 times ....................................................................(12)
3. (K2, M1) x 6 times ....................................................................(18)
4. Knit all
5. (K1, K2tog) x 6 times ................................................................(12)
6. K2tog x 6 times ..........................................................................(6)
Transfer the 6 stitches in a tapestry needle and sew the ends and sew around a little fit to give a firm tail as this will support the bunny while sitting